Monthly Archives: July 2014

Summer Berry Pavlova (Gluten-Free, Dairy-Free)

It’s not too often I go into full baking mode. Usually for me, baking means something quick, easy, and with enough healthy substitutions that it barely slides as a dessert. There are a few times a year I go all-in, break out elaborate recipes, and cut no corners. Making this Summer Berry Pavlova was one of those times.

Summer Berry Pavlova (Gluten-Free, Dairy-Free)

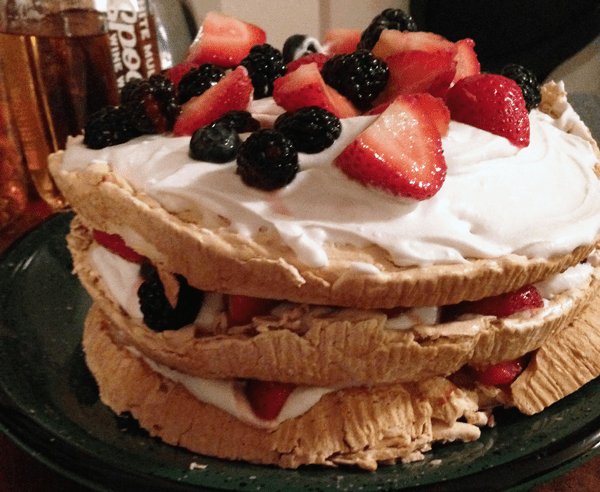
A meringue dessert, pavlova is naturally gluten-free and easy to adapt to be dairy-free. Even better, it’s a recipe where no one will mind, or even notice. Honestly, it’s that good. The pavlova I made disappeared in just a few minutes. While it’s not too difficult to make, it is a little time consuming. However, with fresh summer berries at their peak, you have enough of a reason to go ahead and whip up this treat.

Summer Berry Pavlova (Gluten-Free, Dairy-Free)
adapted from Epicurious.

Makes 8 servings

Ingredients
For Meringue:
• Earth Balance or other non-dairy shortening (for greasing pan)
• Powdered sugar (for dusting pan)
• 1 cup white sugar
• 1/2 cup light brown sugar, packed
• 1 1/2 tbsp corn starch
• 1 1/2 tbsp vanilla extract
• 2 tsp white vinegar
• 6 egg whites
For Berries:
• 1 1/2 pounds of mixed berries (strawberries, blackberries, raspberries, blueberries)
• 2 tbsp granulated sugar
For Cream:
• 1 can of regular coconut milk (refrigerated overnight)
• 1 tsp vanilla extract

Equipment
• 3 8-inch cake pans
• parchment paper

1. Preheat oven to 275º F. Grease the pans with shortening and dust with powdered sugar. Shake off any excess. Line the bottom of each pan with a round of parchment paper.
2. Mix white sugar, brown sugar, and cornstarch in a medium bowl until well-incorporated. Set aside.
3. In a small bowl, stir together vanilla and vinegar. Set aside.
4. In a large bowl, beat egg whites using an electric mixer at medium speed until they hold soft peaks, about 5 minutes.
5. Increase the speed to medium-high and add the sugar mixture one tablespoon at a time. Once all the sugar mixture has been added, continue to beat for one minute.
6. Add the vinegar mixture and beat at high speed until the meringue holds stiff peaks, about 5 minutes.
7. Distribute the meringue evenly into the three pans, smoothing out the tops with a spatula. Bake in the oven for 1 hour, or until they form a crisp and dry crust on top.
8. Once finished baking, turn off the oven and prop open the door slightly using a wooden spoon. Leave the meringues inside the oven to cool for 1 hour.
9. Once cool, remove the meringues from the oven and use a knife to loosen from the sides of the cake pans. Carefully turn meringues over onto a plate and out of the pans. Peel off the parchment paper, and then flip back right side up.

Summer Berry Pavlova (Gluten-Free, Dairy-Free)

Prepare berries:
1. Wash berries and combine in large bowl (quarter and remove stems if using strawberries). Toss with sugar and let sit at room temperature for up to 1 hour.

Prepare cream:
1. Turn the coconut milk can upside down and open. Pour off all the coconut water sitting on top, and reserve for another use (smoothies!).
2. Scoop out the thick coconut cream left in the can into a large bowl. Add vanilla extract.
3. Beat coconut cream on high using an electric beater until it becomes light and airy, resembling whipped cream, 3-5 minutes.

Assemble dessert:
1. To assemble the pavlova, stack meringue on a serving plate, followed by one third of the whipped cream and topped with one third of the berries. Repeat with two remaining layers of meringue, cream, and fruit.

Eat immediately after assembling, and don’t count on leftovers.

Half-Sour, Whole-Delicious Refrigerator Pickles

It’s pickle season my friends. Cucumbers are abundant at farmer’s markets and just begging to be brined.

Cucumbers ready to pickle

I’ve always loved pickles. I have this vivid childhood memory of going to a flea market in Florida with my grandparents that had a pickle stand. Not just a pickle stand, but a “Pickle on a Stick” stand. Barrels and barrels of different types of pickles, served up on a stick, the ever so convenient snack. What an idea. I’m still waiting for the “Pickle on a Stick” idea to catch on. For now, I make my own pickles at home.

Half-sour are my favorite pickles to make. They’re crunchy, garlicky, and hold on to that fresh cucumber flavor. I almost always make refrigerator pickles (rather than canning) because it’s quick, easy, and they’re ready in a week. Refrigerator pickles don’t last as long as canned and should be eaten within a month, but that’s never a problem in my house.

Half-Sour Refrigerator Pickles

Makes as many pickles as you can stuff into a quart-sized jar (about 10)

Ingredients
• 4 cups of water
• 1/8 cup of kosher salt (not sea salt)
• 8-12 small cucumbers (Gherkins or Kirbys)
• 3 cloves of garlic
• 1 tbsp fresh dill, or 1 tsp of dried dill
• 1 tsp coriander seed

Equipment
• quart-sized glass jar with air-tight lid

1. In a small saucepan, bring 4 cups of water to a boil.
2. Remove water from heat and add salt, stir until dissolved.
3. Wash cucumbers. Leaving them whole, put cucumbers into a very clean glass jar. You can pack them in fairly tightly.

Half-Sour, Whole-Delicious Refrigerator Pickles

4. Peel and lightly smash the garlic cloves with a knife. Add to the jar, along with the dill and coriander.
5. Pour hot salt water into the jar, making sure that all cucumbers are submerged. You may have extra water, that’s okay. Seal jar with the lid.
6. Let the jar come to room temperature, and then move into the fridge. Your pickles will be ready to eat after a week, and will keep in the fridge for up to a month!

Kombucha: An Introduction

I couldn’t go too long without writing about kombucha. It’s one of my favorite things to make, drink, and share. Effervescent, sweet, and tangy, Kombucha is fermented tea. It has been around for hundreds of years (at least), and fallen in and out of fashion here in the US.

Kombucha is claimed to help with digestion, detoxification, treat arthritis, and boost your immune system. While the jury is still out on some of these benefits, kombucha is at the least a tasty, highly probiotic drink, known to be filled with gut-healing bacteria. Personally, I find it to be a great pick-me-up, sometimes replacing coffee. My boyfriend has said it cures his headaches. But above all else, I drink kombucha because it is delicious.

bottlesFresh bottled booch

I don’t remember the first time I tried kombucha, but after that first sip, I never went back. It’s both tart and sweet, with a deep fruit-like flavor. The scent is reminiscent of apple cider vinegar, which can be a deterrent for some. The first kombucha I had was GT’s, which is widely available and often blended with fruit juice. It’s a great starter kombucha. Unfortunately, the stuff is expensive, so once I was hooked it didn’t take long to think about making my own. Turns out, it’s remarkably easy, and there is no shortage of online resources to support you along the way.

Before brewing kombucha, you need to learn about the SCOBY. A SCOBY is a Symbiotic Colony Of Bacteria and Yeast. It’s rubbery, slimy, and generally unattractive, but this culture is responsible for making all the good stuff happen. In just a few days, the SCOBY will turn sugary tea into fizzy, beloved booch.There’s a few ways to get your hands on one. If you happen to know a fellow kombucha brewer, they are likely to have an extra on hand. Every time you make a batch, the SCOBY produces a second baby SCOBY that can be used separately. If you can’t get one from a friend, it’s just as easy to get a good one at a local home brewing store or online. Cultures for Health is a trusted online shop, but you’ll find tons more on Amazon. If you’re feeling particularly ambitious, you can make your own, though I don’t have any experience doing so myself.

scoby-closeMy odd-looking current SCOBY, a smaller mature one with a larger young one attached

Want to get started? Below is my tried and true recipe for basic kombucha.

Basic Kombucha

Makes 1 Gallon

Ingredients
• 14 cups of water
• 8 teabags or 4 tbsp of organic green or black tea (no flavored teas)
• 1 cup of organic sugar
• 1 SCOBY
• 1-2 cups of starter tea (reserved from another batch of kombucha or wherever you got your SCOBY from)

Equipment
• a large glass container with an open top (at least 1 gallon)
• a wooden or other non-metallic spoon (contact with metal will damage the SCOBY)
• a non-metallic strainer
• cheesecloth or a paper towel, and a rubber band

1. Bring 6 cups of the water to a boil, then remove from heat. Add the tea and let steep for 4 minutes. Then remove the tea and add the cup of sugar, stirring until it is fully dissolved. Add the remaining 8 cups of water to help bring the tea to room temperature.

2. Once the tea is at room temperature, pour it into your glass container (it is important not to be warmer to prevent damaging your SCOBY). Then add both your SCOBY and starter tea to the container.

3. Cover the top of the container with the cheesecloth or paper towel and secure with a rubber band. Your tea is now ready to ferment! Find a place for it that will remain at room temperature and out of direct sunlight. The fermentation process can take anywhere from 5 days to 2 weeks. The longer it ferments, the less sweet and more sour the kombucha becomes. I’ve found that 7-9 days is my sweet spot, but feel free to taste your kombucha along the way to figure out when it’s just right for you!

doublebrewstrain2
Brewing and straining

4. Once you like how your kombucha tastes, you are ready to move from fermentation to bottling. Remove the SCOBY with your non-metallic spoon along with 1-2 cups of the kombucha. You can start another batch of kombucha with this right away or store in a closed jar in the fridge for up to 3 weeks.

5. Pour the kombucha from your container into smaller, air-tight containers using your non-metallic strainer to filter out any of the slimy yeast that formed in the process. It’s safe to drink, but not necessarily enjoyable. Make sure to leave at least an inch of room at the top of the jar for air, to prevent your bottles of carbonated booch from exploding.

At this point, the kombucha is technically finished. However, I ALWAYS do a second fermentation to make my booch more bubbly.

6. For second fermentation, seal the containers and leave out at room temperature for another 24-48 hours, then move to the fridge. Do not leave out of the fridge for more than a few days, because again, all that carbonation could cause the containers to burst.

Second fermentation is also your chance to add fruit juice to make flavored kombucha. I’ll have recipes coming soon, but in the meantime I suggest exploring Phickle, my favorite blog. There are some fantastic recipes, including this seasonal Cherry Kombucha.

cherrybooch
Phickle’s cherry kombucha

I hope you enjoy the kombucha adventure as much as I do. If you run into any questions, leave a note for me in the comments, I would love to chat and help out.

Watermelon-Cucumber Cooler (Best Cocktail Ever)

Each year for the Fourth of July, we have a party with family and friends at my boyfriend’s parent’s summer house. On a river in New Jersey, it’s one of our favorite places to be.

sweetwater

We cook up quite a feast, the local seafood and farmstands give us a lot to work with. I usually end up with the duty of making cocktails for the crowd. Naturally, I want a drink that makes the most of the delicious produce the summer has to offer. I’ve done sangria and mojitos, which are all good, but last year I really found a winner. This Watermelon-Cucumber Cooler recipe was incredible. Made from a base of fresh watermelon and cucumber, it requires a little bit of work but is totally worth it.

cooler-600

Watermelon-Cucumber Cooler
Adapted from Martha Stewart.

Makes 4 Cocktails

Ingredients
• 5 cups of seedless watermelon (I used one small watermelon)
• 1 large english cucumber
• 1/4 cup fresh lime juice (from 2 limes)
• 2 tbsps honey
• 2/3 cup vodka (rum and tequila would work great as well)

Equipment
• Blender
• Fine-Mesh Sieve (you can opt not to use a sieve, the drink will just be thicker)

1. Cut the watermelon into chunks, or scoop out using a metal spoon. Put watermelon in blender and puree until liquified into juice. Pour the watermelon juice through the sieve into a large bowl or serving container. Use a spatula or back of a spoon to push down on pulp to squeeze out all the juice.

2. Peel the cucumber and cut into large chunks. Puree cucumber in blender until liquified. Add the pureed cucumber juice through the sieve to the watermelon juice in the bowl/container.

3. In a small bowl, mix the lime juice and honey. Stir the mixture into the watermelon-cucumber juice, then add the vodka or other liquor of your choice.

4. Taste and adjust sweetness if needed. Split into four glasses and serve with ice.

Enjoy!

watermelon-600

Farms That Deliver: Joining a CSA

This spring, I signed up for my first CSA.

It’s something I’ve had my eye on for a while. Excited to share the news, I found many friends asking exactly what a CSA was. CSA stands for community-supported agriculture, a local system of agriculture and food distribution. What exactly does that mean? You pay up-front to receive a weekly (or bi-weekly) deliveries of produce for the length of the growing season, and in doing so, make a commitment to directly support one or more local farms. It’s a mutually beneficial partnership between farms and their surrounding community. Farms are guaranteed to sell a certain amount of food, and we get a variety of fresh, seasonal, and local produce dropped off each week.

csa
My first CSA share. Watercress, beets, collards, tomatoes, and some killer cremini mushrooms inside that paper bag.

A CSA here in Philly runs from $15 to $30 a week, but varies a lot depending on the size of the share you get (say, fruits and vegetables for two people, or for a family of four). Pick-up locations are all over the city: restaurants, shops, cafes, even people’s houses. I was thrilled to find out my neighborhood coffee shop had become a pick-up spot, and couldn’t resist signing up.

I highly suggest a CSA to anyone who is interested. Try it out for a season and see how weekly produce works for you. Even consider splitting a share with a friend.

A couple I would recommend currently have sign-ups open for the summer:

Philly Foodworks 
Small Share: $395 Annually ($17.95 Weekly)
Large Share: $625 Annually ($28.40 Weekly)
This is my CSA, and I love it. Philly Foodworks offers some unique features that I haven’t seen before. They have three different types of memberships: farmer’s choice, mixed, or your choice. I have the “your choice” option, which means each week I can shop for items via an online market. Distribute your money how you wish, spend different amounts each week and have the option to skip a week when you’re away. The selection of fruits and vegetables changes weekly, based on what’s in peak season. A partnership of several local farmers and vendors, Philly Foodworks also offers eggs, cheese, breads, jams, and more.

Greensgrow Farms
Half Share:  $448 Annually ($34.46 Weekly)
Full Share:  $800 Annually ($33.33 Week)
Greensgrow Farms is a urban farming project and nonprofit initiative in Philadelphia. Their mission focuses on the practice of sustainable entrepreneurial urban agriculture. Greensgrow harvests crops on site and purchases from other trusted farms located all within 150 miles of the city. Each week’s robust share contains fruit, vegetables, and a choice of protein (eggs, yogurt, tofu). Some weeks include cheese, fresh pasta, or even beer.

csaGo ahead, “taste the difference.”

Have you been a part of a CSA, what was your experience? Any recommendations?